Flashing laps
A lap is the part of a flashing that covers (or overlaps) any part of the similarly shaped component, and these can be
described as an end lap, overlap or underlap. Laps should comply with the following criteria:
• an overlap must run over (not under);
• an overlap must run downhill (the direction of the water flow);
• water must flow over a lap (not into a lap);
• a lap must be self-draining (not relying on sealant);
• an overlap must be across the gradient or at a shallow angle;
• a lap must be mechanically (hard) fixed;
• a sealed lap must have a minimum of width of 25mm;

Apron flashing
Do not fit cladding tight onto the horizontal surface of an apron flashing. This would collect dirt and debris and it will
retain moisture. A minimum clearance of 25mm is required.
Longitudinal flashings
Longitudinal flashings run parallel to the pans or valleys, and are made to suit the cladding profile (Figure 3.5.1).
They should have an edge turned-down to dip into the pan or valley.
Flashing Cover
The minimum recommended cover of longitudinal flashings over cladding should be as follows: (as taken from HB39-
1997)

Transverse flashings
Transverse flashings run across the pans or valleys. They usually have a stiffening lip, along the lower
edge, which is turned-down to dip into the pan or valley. To maximise weatherproofing, the bent lip is profiled to fit.
The turn-down for transverse flashings for the shallow corrugated profiles can be fashioned to fit the profile by
either notching or scribing to match the corrugations, or lightly dressed into the valleys. The type of fashioning (if
any) depends upon profile shape and the type of material used to flash. Fashioning is preferred for low-slope roofs.
The turn-down for transverse flashings for wide panned cladding is always notched or scribed to fit over the ribs.
Flashing Cover
There are a range of standard flashings (hip, barge, apron). To increase weather-resistance, we recommend
you maximise the overlap between flashings and claddings.
Fixing of Flashings
Longitudinal flashings shall be fastened at maximum 500mm centres. Transverse flashings shall be fastened in
accordance with HB39-1997, as detailed below.
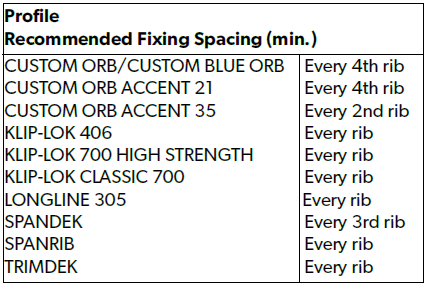
The above fastener spacing relates to the stitching of flashings to sheeting. It does not constitute the minimum number of fasteners required to fix the sheeting to purlins.

Notching tools
Hand-operated notching tools cut one notch at a time. Each tool matches only one cladding profile. There are two types
of tool; their use depends on whether or not the edge of the flashing has first been bent down.
Using notching tools
After the cladding is fixed and the turn-ups finished, proceed as follows.
• Place a flashing with the notch-edge resting on the ribs.
• Locate your notching tool over a rib with the notching head against the flashing.
vertical tool: The body locates along the rib.
horizontal tool: the lugs on the underside locates on top of the rib.
• Raise the handle to open the tool and:
vertical tool: lift the flashing into the mouth of the tool;
horizontal tool: slide the mouth of the tool over the edge of the flashing as far as it will go.
• Push down on the handle to perform the notching.
• Repeat for all ribs, checking in each case that the flashing is correctly positioned.
• If you are using a horizontal tool, bend down the tongues between the notches over a suitable straight edge (such
as a piece of timber).

Notching with tinsnips
If notching tools are not available, flashings can be notched to the rib profile with tinsnips. The procedure
is sometimes known as scribing. After the cladding is fixed and the turn-ups finished, proceed as follows.
• Place the flashing with the turned-down edge resting on the ribs.
• Mark out the notching using a template positioned over each rib.
• Cut the notches with tinsnips.
This procedure is also used for hip cappings.

Fasteners for transverse flashings
You must properly fix both flashings and the ends of all sheets.
Where the cladding is pierce-fixed through crests, and the position of the purlin allows it, the fasteners used to fix the
sheets, may also fix the flashings. On all other installations, pierce-fix your flashing to the ribs or crests of the sheets.
Joining flashings
The overlaps of transverse flashings should be sealed with a recommended sealant and fastened. Before finally
positioning and fixing the lap, turn over the top piece and apply a 3mm bead of sealant across the flashing, about
12mm from the end.
Flashing at change of pitch

Gutter apron
Where the ends of roof cladding are exposed to environmental contaminants such (industrial pollutants,
sea salt) provide an over flashing which discharges into the gutter.
Benefits of gutter apron:
• Protects to the underside of the roof cladding/ underlay.
• Provides support for the roofing underlay which can be damaged by wind and solar radiation.
• There is an air gap between the spouting and the fascia where PVC spouting is used, caused by the thickness of
brackets. In areas exposed to sea air, a gutter apron can minimise the risk of corrosion of the unwashed area.
• Can be used if there is no spouting or it has a low front.
• Protection against wind-blown embers.
• Contaminants can be driven up the ribs of the cladding if exposed in a severe environment. Metal flashings or
profiled foam fillers can be used to prevent or reduce this.
The over flashing should extend 50mm into the gutter and
the underlay finishes on the down-side of the flashing.
Extend the underlay into the gutter by a minimum of 20mm
if there is no over flashing into the gutter.
