Types of flashing penetrations
Penetration flashings can be divided into four different types.
Type A

Under flashings drain at the plane of the roof pan.
Soaker (under) flashings
• Suitable for any pitch;
• Most preferred detail;
• Curb side in line with the rib;
• Leave clearance of 10mm (minimum) all around;
• minimum of 100mm for all upstands;
• Drill holes for rivets before sealing;
• minimum 25mm for sealed laps;
• Order slightly longer cladding sheets to allow for
lapping;
TYPE B

Overflashings drain at the plane of the rib of the roof.
These are also known as back flashings.
• Simple to use
• Suitable for use to first purlin from the ridge if > 300mm wide.
• Not suitable for widths over 1.100m
• regarded as unattractive by some
• Suitable for use with sprung or over-roof design.
Type C

Tapered flashings that drain at the plane of the roof pan at
the top, and over the ribs at the bottom.
Also known as transition or ‘under/over’ flashings.
Tapered or transition flashings
• Provides greater water run-off capacity
• Suitable for all roofs > 5°.
• Can be used for a retrofit
• Support required
Type D

Soaker flashings that drain at the plane of the roof pan at
the gutter
• Simple
• Provides greater water run-off capacity
• Suitable for all roofs > 5°
• Can be used for a retrofit
• Support required
• Limited to 1.1m wide and 2.4m long
Flashing large roof penetrations
Penetrations through ribbed cladding block the valleys (or pans), and thus affect the free flow of rainwater down a roof. All flashings have to weatherproof the cladding – but on the uphill side of large penetrations, they also have to channel rainwater sideways into valleys that run unobstructed to the eaves.
Four methods are described here. In all methods the ends of cut ribs may be closed off with caps on the outside of the rib, or with plugs inside the ribs. Plugs must be used on side-laps to allow the anti-capillary cavity to drain.
Note: For masonry construction, Building Code Australia (BCA) requires the use of Damp Proof Course (DPC) to ensure weather-proofing. For acceptable methods see BCA section on weather-proofing masonry.
SUPPORT FRAME
Wherever one or more of the sheet ribs are cut, you must provide framing to support the cut ends of the roof cladding each side of the penetration.
EXISTING FLASHING
If you have to re-use lead flashings that are built into the structure, special protection is needed.
METHOD 1: HEAD GUTTER AND APRON FLASHINGS

This is often the simplest method, and commonly used for existing protrusions
METHOD 2: FLAT TRAY AND SLEEVE
To avoid fitting and sealing end caps to all the sheet ribs on the low side of the penetration, an apron flashing can be
fitted to the sleeve and sealed to the tray each side.

METHOD 3: TRAY GUTTER FOR STEEPER ROOFS
If the roof pitch is more than, say 1 in 12 (5°), you cut the roof cladding sufficiently high above the penetration to allow a tray gutter to raise rainwater over the top of the
sheet ribs and divert it around the penetration.

METHOD 4: PENETRATION CLOSE TO RIDGE CAPPING
If a roof penetration is close to a ridge capping (or flashing above the penetration), you can fit a simple flat tray, on top of the roofing, so that it extends from under the capping down to a sleeve around the penetration.

FLASHING SMALL ROOF PENETRATIONS
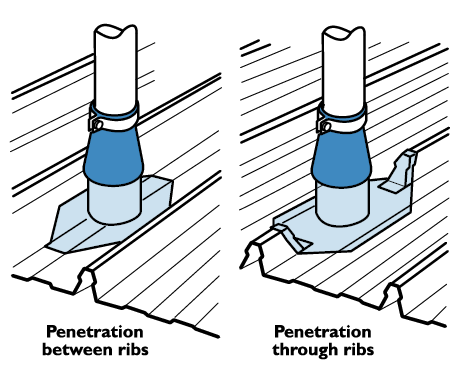
A flanged cylindrical sleeve is a fairly simple method of flashing around small penetrations (such as pipe penetrations) which fit between the ribs of a roof sheet, or penetrate only a single rib.
Two methods are described here.
Wherever roofing is cut, you must consider providing extra support for the roofing above and below the penetration.
Where one or more of the sheet ribs are cut, you must provide framing to support at the cut ends of the roof cladding each side of the penetration.
METHOD 1: TAPERED METAL SKIRT AND SLEEVE
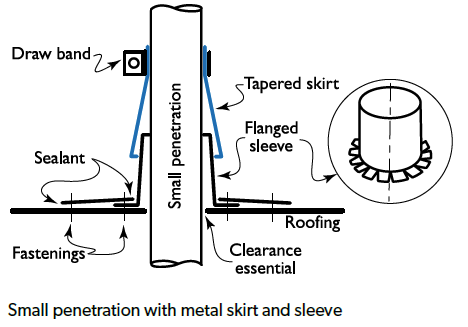
This method uses parts custom-fabricated from metal.
There is no positive seal between inside the building and
the outside atmosphere.
METHOD 2: SLEEVE

This is often the simplest method (Figure 3.13.2). Flexible flanged sleeves can be bought for flashing around penetrations of at least 350mm diameter. They overcome
the problem of capping and sealing the open ends of cut ribs. A sleeve is commonly used, though silicone sealant has a wider operating temperature range and is available in
a wider range of colours. The flange around the base of the sleeve can be contoured
by hand to match the cladding profile before it is sealed and fixed to the cladding.
Be careful not to dam any valleys or pans so that rainwater can drain freely from the high side of the roof penetration. Moisture held in such areas can cause deterioration
of the sheet coating, reduced life expectancy or poor appearance. Where damming of any valley or tray is unavoidable, due to the size of the pipe penetration, treat the installation as a large penetration.
COPPER PENETRATIONS
All copper pipe penetrations through Zincalume ® or Colorbond ® steel cladding must be physically and electrically isolated from the cladding. This can be done by
using a sleeve of PVC polyethylene or similar plastic that is also ultra-violet stable.